Tutorial : Star Trails
Hi Everyone,
One thing I love in Long Exposure photography is the trails stars can leave in images. This quick tutorial will let you know the factors you need to get great results.
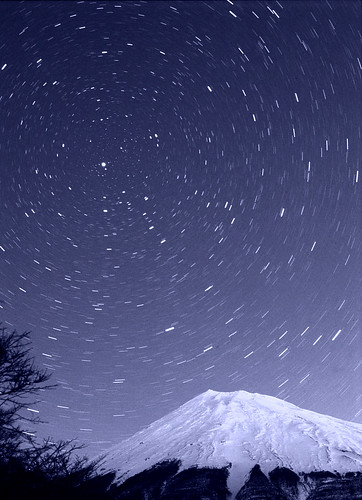
Firstly, I think you need to see the photography I’m talking about, (if you haven’t already seen it, or imagined it). This photograph from ‘velvet paw‘ shows the beauty star trails can show in images:
 There are many physical factors that help hugely in taking a long exposure photograph with star trails, so before you can start to think about what you need kit-wise, you need to know about what weather and location is necessary.
- Little or no Clouds
Clouds in a picture of star trails can be very attractive, but too much and it defeats the point of the image. Realistically, I’d probably only consider doing a long exposure with star trails if the weather was cloud free, and it there were clouds to come along, chances are they wouldn’t be particularly ruining to the image.
- Clear, dark Skies.
You’ll find that to get the best shots it has to be very clear, even when there are no clouds, chances are, if you live anywhere near a built up area, that there will be significant light pollution preventing the best image possible, therefore, you may need to travel to get to the best location. I’ve found that on many occasions I’ve started off an exposure, and by the time its done have the shock of discovering the ambient light was too much, and the star trails have been washed out by it.
- A subject is pretty much required.
I find that a long exposure performed solely or predominantly for capturing star trails can be incredibly uninteresting if there isn’t a subject in the photograph. Again, returning to the fabulous image of Mt. Fuji, the subject makes the image. I find that you don’t need an amazing subject, but having one is pretty much a necessity, cars can be cool subjects, if they are well cleaned, you get reflections of the star trails, and the same goes with water.
—
Next is the kit you will need for the images. Realistically, you need a prosumer or SLR camera, (?), with a Bulb function, (often shown on the camera as B). You can easily discover if you camera has this function by turning it on, switching to the M position, (fully manual). Then turn the shutter speed as slow as possible, and often, after the slowest speed the camera does, you’ll be shown a B, or Bulb:
You can see the display on my 400D above. The bulb function means that the shutter stays open as long as you have got the shutter button pressed down. This means that you would be holding down the shutter button for a long time, and thus you may wish to purchase a shutter release cable, that can allow you to lock the shutter button down and keep it open whilst you wait. An example of such a product can be found here.
If your camera has this function, and you’ve sorted out a way to hold your shutter open, I can move on to a quick list of what you will need:
- Camera with Bulb Function
- Tripod
- A subject
- Time 🙂
With those things you are pretty much set to go, oh, there is one last thing, you will find with digital cameras, the battery will run out eventually, so if you are planning to take many, try and take a few back up batteries, or if you can some form of mains power.
—
The method for this ‘genre’ of photography is very simple really, you will want to set up your camera, looking at a subject that you have chosen for the photograph. The camera should be atop a tripod, and preferably have a cable release attached to it, to allow the camera to stay on for a while without your intervention.
Now, lock the shutter down, and your camera, well, most cameras will display a time on the screen like this:
 This allows you to see how long your shutter has been open, and therefore how long your exposure has been so far. I find that it is best to leave your aperture wide open, (smallest f/number), and then to experiment with the timings, as the brightness of the stars varies from location to location. This part basically requires a lot of experimentation, and if it is quite bright and you want longer exposure times, then you get a smaller aperture, and try again. I recommend that you start at around 5-10mins, and depending on your results there, you can adjust aperture, (if necessary), and then increase the time to 30-40mins or more!
For a fairly extreme star trail, you will probably want about a half hour exposure, and something like the above Mt. Fuji photo was probably more along the lines of 10-15 minutes.
—
I hope that this has been an informative introduction and tutorial into the world of star trail photography. Let me know if you get some good ones!
Charlie –
Filed under: amateur photography, aperture, guide, how to, lens, lessons, long exposure, photo lessons, photo tutorial, photography, photography guide, star, star trails, tips tricks, trails | 7 Comments
Quick Tip: Slow Sync Flash
Hi Everyone,
Obviously I haven’t been posting much recently, but I’ve just been immensely busy, I thought I’d write a quick, kind of, ‘tip’ on Slow Sync Flash, because it’s something I use quite a lot, and it’s great for making flash photography look acceptable. And, I mean, more with built in flash, because obviously, a large professional flash wouldn’t make photographs look that bad in the first place.
Basically, the theory behind this consists of how flash photography tends to work with built in flashes, if you just go on Auto and shoot someone with the flash on, you’ll probably get a picture of just them, isolated from the background, and looking clammy and horrid, unnatural because of the flash. The genius behind slow sync flash is that it combines flash with a long exposure, meaning that you get the illumination of the subject, but you also get some natural tones in there, and of course the background starts to expose, meaning that your subject isn’t just standing in a black abyss.
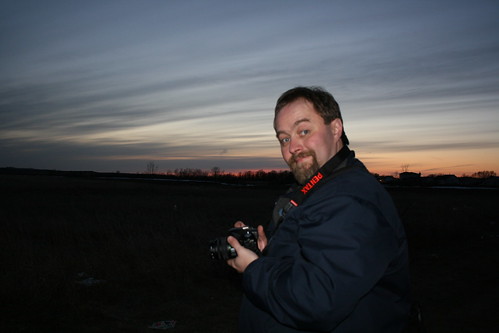
This photograph by Theodore Baschack shows the way in which using the ‘Night Portrait’ mode on many prosumer cameras and SLRs can work, (this is basically a slow sync shutter mode).
You can also use this method of photography for more artistic and amusing purposes, making strange but wonderful images. For example, you can kind of do double exposures in one photograph, which can lead to a lot of fun. Here is an example:
 This photograph from Angela shows how you can use it for fun expressions and dual characters etc.
I’d like to finish discussing this by saying that this is really something that you will just want to play around with, experiment and have fun. There are many ways you can have fun doing this, serious and fun, so enjoy.
Hope you’re well,
Charlie –
Filed under: 2007, amateur photography, camera, fill flash, flash, how to, long exposure, photo lessons, photo tutorial, slow flash, slow sync flash, tips tricks | Leave a Comment
Timelapse: Sunset this Evening
Hi Everyone,
Well, I can only say sorry for not having posted much recently, I feel guilty that after buying the domain: theapblog.com, my posting has gone drastically down, but, there’s nothing I can do, I’ve been completely downed with work from school, and have had no time to get anything done really,
but,
I did get a spare moment alone the 0ther day with an incredible sunset, that you must see, I love it, so I made a timelapse that you may find interesting, or not, we’ll see…!
And you can view a high quality version at my Stage6 account, HERE.
Anyway, I hope you’re all well, and, normal service shall resume at some point, (just don’t ask when…).
Charlie – 🙂
Filed under: timelapse time lapse photography random charlie styr wo | Leave a Comment
Photography 101 : Portraiture
Hey Reader,
I’m sorry that as usual I haven’t been posting very much, well, that’s that, I don’t often get that much done, as I’m very busy. But I thought I’d throw together a quickie on Portraiture. It is probably one of my favourite subjects in photography, and I think, when done well, it is really interesting, and I have some tips that I’d love to share with you.
Aperture
=======
The use of aperture correctly in portraits is very important. Using a wide aperture, (small f/number), you can get very shallow depths of field which can throw the background out of focus and isolate your subject in the frame.
This may sound slightly confusing, but it really is very simple and makes probably the biggest difference. Here is an example:
 Photo credit: Ricarda (her Photography)
For example, in this wonderful photograph, we have the subject clearly isolated from the background, and instead the background is a subtle and ‘un-distracting’ array of colour and light. This will have been done by using a wide aperture, and I feel this is the first rule in portraiture.
Subject Position
===========
This is an interesting subject, and can be more complex. I find more often than not, that I keep going back to the rule of thirds, (previous POST), and this provides me with interesting results all the time. You will mostly shoot portraits in ‘Portrait’ orientation, here meaning that the photo is taller than it is wide, although in certain circumstances, you can get very interesting photos from ‘landscape’ orientations, such as this photo:
 Photo Credit: Doug Sparks (his Photography)
Here we can see an excellent photo utilising the abnormal ‘landscape’ orientation, but making it work, using the rule of thirds we have the off centre face, here providing an interesting view. Furthermore, we are shown part of the subject, his character, by being shown his clothing and his hand.
It is important I feel that within a portrait you reveal a persons character, this can be done in many ways, for example, using a persons habits, or an object that reflects their personality, this can be something such as headphones, or a computer, and if it is something that that person is rarely seen without, for example a cigarette or a drink, then including that in the photograph can make it much more about that person, and not about the photo. This is important in a portrait, as the photo is not just a photo, it’s personal.
The Subject’s Actions
===============
Lastly I’ll cover what someone can be doing within a photography, or more importantly, a portrait. You can have very simple ‘Head and Shoulders’ portraits, not dandruff free, but of, literally, a persons head and shoulders. This is very simple, but works well and is often the most effective portrait. Here is an example:
 Photo Credit: Didier (his Photography)
Of course though, photography always begs to be different, and it is oh so easy to make something different, for example, a more action-ish portrait, that captures someone doing what they love, which is often what people want. For example:
 Photo Credit: Maurice Flower (his Photography)
I hope that this guide has been an interesting insight into Portraiture, I hope you’re well, and have a happy Valentine’s day.
Charlie – Teenage Photographer
Filed under: 2007, amateur photography, aperture, how to, knowledge, lessons, photo tutorial, photography, photography 101, photography guide, tips tricks, understanding | Leave a Comment
Hey Reader,
Now, I’m sure many of you have heard of the rule of thirds, and I thought that because it is such, ‘genius’, I should write a short but sweet post on it. The rule of thirds is the most simple but effective thing that you can do to enhance your photography, and it is instant, not much practice needed, you can jump right in.
The rule of thirds is based upon dividing up your image, into a grid a little like this:
 It is a very crude diagram that I whipped up in paint, but it gets the point across. Basically, at the red points, a subject will appear much more dynamic and interesting than one say at the small circle at the centre of the image. I’ll give you an example below. And whilst looking at the images, just keep in mind the diagram above and consider where the subject is:
 Now, I know it’s not the best example, but, at my desk I felt like using a new subject, not an old image. But I feel that it gets the point over, particularly by having the out of focus, (OOF), keys in the background, which I think adds context to what the mouse is actually belonging to.
I feel that the difference is that the first image is what would be used to sell the mouse. I mean, it shows what it looks like, and that’s it. The second image makes the mouse the subject for a nice photograph, and that is the difference.
This tip has probably been my shortest so far, however, I feel it has probably been the most important, and I hope that you have found it interesting, I know that this will be incredibly useful for anyone who hasn’t heard about the rule before, and hopefully a reminded for any of you who haven’t.
I hope you’re well,
Charlie –
Filed under: 2007, amateur photography, cameras, digital, guide, how to, lens, lessons, photography, photography 101, photography guide, tips tricks, understanding | 2 Comments
Review: Canon EF 50mm f/1.8 II
Hello Reader,

I hope you’re doing well, and I thought I’d get a nice lens review in here, as it’s been quite desolate for a while. The lens that will be under the microscope will be the Canon EF 50mm f/1.8 II, which is a budget lens, although it with-holds a very nice surprise. So here goes…
Initial Impressions
Firstly, a new user to this lens will probably notice the amazingly compact size and weight of this lens, it’s amazing really. I’m using it on my Canon 400D, and compared to the Kit lens, this thing is tiny! I’d say that this is a good factor for this lens, it’s size and weight really complements the compact body of the 400D, and contrary to many peoples beliefs, the main lens body is surprisingly sturdy, at least at a parallel with the Kit lens. (18-55). There are quite a few reasons I bought this lens:
- To learn how to work with a Prime Lens
- It is EXTREMELY cheap, (around £52, or $80)
- It had a very large aperture, f/1.8, ideal for low light
- Huge image quality gain over the kit lens
Image Quality
I guess that this it the main point of a lens, not the build quality etc, but, what’s important in the end with photography, is the photo that comes out, and this lens is probably the best value for money lens on the market. Many people say that the lens has ‘L’ quality glass, (if you don’t know what that means, it is that the Canon L series lenses, (the luxury ones), have great quality, and that this is on par with it). I feel that this is most certainly true, the lens gives amazing image quality, here is a shot I have taken with it:
 This shot can tell us a lot about the lens, (please ignore the subject for the moment!), firstly, we can see the clarity, the nun is fully sharp, very crisp and clear. (Btw: the nun is about 8cm tall), and also, we can see the DOF, this photo was taken at f/1.8, the widest aperture, and you can clearly see the completely thrown out background, and also, the gradually ‘blurring’ table detail.
The DOF is very shallow with this lens, meaning that it is particularly great for portraits, and also for outdoors photography, of plants etc, because you can isolate the subject from the background.
The lens tends to perform best when it has been stopped down a bit, say, to f/5+, at which point it provides awesome detail, in particular, the sharpness peaks at around f/5 on my copy. In a summary, I guess I could say that the lens is most certainly great, and it is instantly noticeable when compared with the Kit lens, which I feel a LOT of people will be upgrading from. A last point I should make is that a lot of people will pass over this lens because they feel that since the Kit lens already covers the 50mm range, you shouldn’t buy it, however, that is no excuse for ignoring this lens, because the low light potential pays for itself, seriously.
Build Quality
In my opinion, a far less important aspect of a lens, particularly in a first upgrade from the kit lens, when in the future you are much more likely to upgrade again, say to the f/1.4 variant. Here are some shots of the lens I just whipped up, to show the general aspects of it.
 As you can clearly see, it is a fairly standard looking lens, but one thing, that although vain, I feel is quite useful about the lens, is the fact that it looks different to the kit lens. I feel that this is important, because, the amount of people that use the 400D as their family camera, and never take off the kit lens, (which is fine by the way, I prefer that to using some compact), and if you differentiate yourself from them, you can appear much more interesting.
Anyway, moving onto more real things… The build quality isn’t amazing, but once again I must reiterate that, for what you’re paying, it really is fine, the lens is fully plastic, (except for the glass), even the lens mount is plastic, (as is the kit lens), this allows for the extremely light weight which is really nice. There are some slightly tacky factors to the lens that I will comment on:
- When attempting to focus below min. focus level, the lens ring literally ‘jumps’ up and down, and on top of that, the focusing noise is very excessive, you can get some very moaning sounds out of this lens.
- The AF switch is quite uncomfortable, it is small and awkward and can sometimes get stuck when the clutch moves on and off of the motor.
- The lens element extends considerably during focusing, which coincidentally zooms the image a surprising amount. I personally am a fan of focusing within the lens, not outside… But, that’s not really a problem.
Realistically, these problems aren’t critical, and most certainly shouldn’t change your views on the lens, as it is an amazingly good value for money solution, and more importantly, an experiment into the real world of lenses, outside of the kit. Furthermore, the image quality is so high, that there need not be worries about the build quality.
Conclusion
Positives
- Amazing image quality
- Amazingly cheap
- Very wide open allowing for good low light performance
- Moves you on from the kit
Negatives
- Build quality is average
- Focusing noisy
These are pretty much the facts about this lens, and I think there are very VERY few people that actually wouldn’t recommend this lens to you. Of course, if you have the money, you may as well go for the 50mm f/1.4, however, there are a LOT of people who don’t want to spend that money without experimenting with Primes first of all, and this is most certainly the way to do this.
Recommended Sellers
eBay UK : Seller, ‘Russian Blue‘ = £52
theapblog.com gives this lens: 96%
Reviewed by Charlie Styr, on 30/1/07 for ‘theapblog.com’
————-
Thanks for reading and I hope you enjoyed the review, please let me know what you think, and I recommend the lens wholeheartedly.
Charlie – Teenage Photographer
Filed under: 2007, amateur photography, buying guide, camera digital, knowledge, lens, photography, product review, review, tips tricks | 3 Comments
Again with the business…
Hey Reader,
Once again I’m apologising for being busy, I will attempt to resume normal service soon, but for now, I’m experimenting with some new themes etc. Let me know what you think of the current theme, I like it, but it’s more important what YOU think!
Furthermore, I’m also considering getting a ‘real’ domain name for the blog, I was contemplating on: ‘theapblog.com’ or ‘apblog.net’ and at the moment, I’m leaning at the .com one…!? What do you think?
Hope you’re all well,
Charlie –
Filed under: 2007, aperture, camera, christmas photos, iris, knowledge, photo tutorial, publish | Leave a Comment
the new apblog
Hey Everyone,
I hope you’re well, I’m thinking of switching to WordPress, and it is mighty tempting, although I’m not sure how I’m going to get all of my old stuff from blogger (new) to WordPress, but when I can, I will, and that will be that.
Tell me what you think of the theme etc,
Charlie –
Filed under: Uncategorized | Leave a Comment
Sorry for the Break
Hey Everyone,
Here are some photographs I’ve taken since last time:
 Foggy weather in Austria
 A shot of some Christmas Sparklers
 On The Wing
I’d just like to say that I’ve got a random surge of Traffic, which is cool, it all seems to be coming from Reddit.com, (?), which is cool, must be a big site, so thanks for that, I’ll be getting some guides up soon, oh yeah,
I GOT MY 400D!!!!
Anyway, I’ve done some time lapse, so I’ll get that on here at some point for you to see, it’s pretty damn cool, so that’s good. Anyway, not much else to say, but I’ll get some guides up, wait I’ve already said that, oh yeah! MacWorld today, how exciting, I can’t wait to see what comes out of Steve Jobs today… looking forward to it…!
Sorry, back to the blog, again, I’ll get a guide up on lenses, the types of lenses, uses, and choosing what you’d need, which I think would be good, as the amount of people using DSLRs now is huge, and the amount still using the kit lens is also huge!!! (I’m one of those, although I just bought a 50mm f/1.8 of eBay), so, we’ll see how that goes, it probably won’t be for a while, as I’ve got so many exams coming up soon, but we’ll find out soon,
Hope you’re well,
Charlie –
Filed under: Uncategorized | 1 Comment
